# Introduction
Verification is the process that enrols a device with cryptographic material (M-Pin ID) used for future authentications. With the M-Pin Authentication Protocol an authentication can’t be facilitated without an M-Pin ID provisioned in advance. There are no restrictions about this process. It can be online - email or SMS verification or offline - user presenting his national ID to a representative. MIRACL Trust uses email verification by default and Pluggable Verification is the mechanism to implement a bespoke verification flow. Using “Pluggable Verification” the client is responsible for verifying their users and MIRACL Trust will require this verification to issue an M-Pin ID.
With Pluggable Verification enrolment flow is in two steps:
-
External verification - The Relying Party Application (RPA) creates their own unique verification flow based on their needs. Once the verification has passed, the RPA makes a request to the MIRACL platform to register an MPin Identity and receive an activation code for the given user.
-
User registration - With the received activation code, the Client activates the user identity and finalizes the registration process on our platform.
sequenceDiagram Client ->+ RPA: Start verification process for userID RPA->+MIRACL: Generate MPin Identity and activation code MIRACL -->- RPA: mpinID, activation code RPA -->- Client: mpinID, activation code Client->+MIRACL: Initiate Registration with activation code MIRACL-->-Client: Client secret shares Client --> Client: Enter PIN Client --> Client: Complete identity registration
# Configuration
Before using pluggable verification, you need to change the settings of your
project from the MIRACL Trust Management Console. After authenticating in the
console, navigate to your Project and choose Settings from the Administration
navigation section. There you will find a section for the
Verification Method, which should have a value of Default (email). You
can change this value to Custom and this will enable the additional
configuration options for a customised verification:
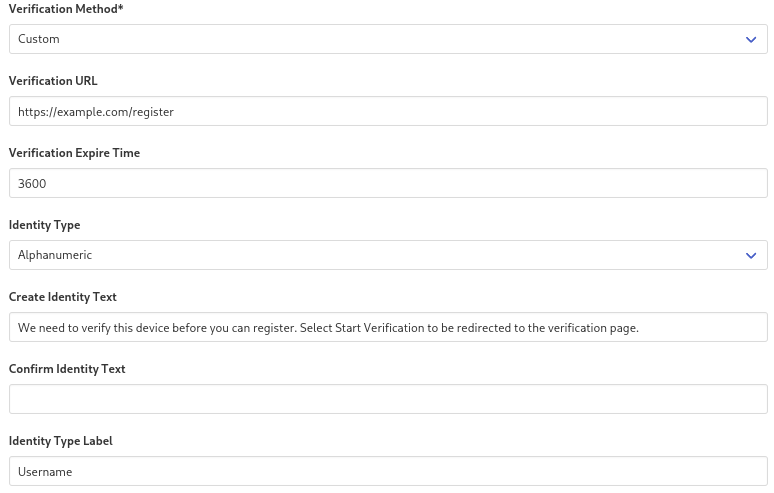
- Verification URL - If the users navigate to the login page without having a pre-registered identity, they will see a screen that tells them they need to start the verification process. The Verification URL is the link on your system to which the user will be redirected in order to start the verification process.
- Verification Expire Time - The expiration time for the verification session in seconds. Has a default value of 3600 (1 hour).
- Identity Type - By default MIRACL Trust uses an email address for a user
identifier. If you are using pluggable verification that is not a requirement,
as you can have an identity scheme that does not rely on emails. You can change
the value to
Alphanumericto allow for other identifiers like usernames or account numbers. - Create Identity Text - Before being redirected to the Verification URL,
the user will see a screen explaining to them how to verify. Here you can
specify a custom text to be displayed on that screen. It will default to
We need to verify this device before you can register. Select Start Verification to be redirected to the verification page. - Identity Type Label - The label that will be displayed when refering to the
user identifier. When the Identity Type is set to
Emailit will default toEmailand when set toAlphanumericit will default toIdentity.
Configuring Pluggable Verification will incur additional costs for your account.
# Implementation
After the user is verified from the RPA, their identity needs to be activated in the MIRACL Platform. This is done by the following request from the RPA:
# Request example
curl -X POST --user "<CLIENT_ID>:<CLIENT_SECRET>" --data '{"userId": <USER_ID>, "deviceName": "<DEVICE_NAME>"}' https://api.mpin.io/activate/initiate
# Response example
{
 "mpinId":"<MPIN_ID>",
 "hashMPinId":"<HASH_MPIN_ID>",
 "actToken":"<ACTIVATION_TOKEN>",
 "expireTime":<EXPIRE_TIME>,
 "redirectURI":""
}
All values are redacted.
After a successful activation request, the user needs to be redirected to the
OIDC authorization endpoint (as described in Integrate through
OIDC). The activation token from the
response should be passed to the authorization endpoint as
an URL parameter acttoken. In addition, the user ID should be passed as
prerollid.
Here is an example of an authorization endpoint URL:
https://api.mpin.io/authorize?client_id=<CLIENT_ID>&redirect_uri=<REDIRECT_URL>&response_type=code&scope=openid+email&acttoken=<ACTIVATION_TOKEN>&prerollid=<USER_ID>
At this point, the user will be asked to choose their PIN. After the PIN is confirmed the enrolment process is finished. The device where this process is taking place is provisioned with an M-Pin ID. Users can now authenticate using the PIN chosen for the device. Users can go through the verification process for each device they want to use for authentication or use Quick Code to enrol additional devices using the already enroled one.
# API reference
- POST
/activate/initiate- Creates an MPin Identity and receives an activation token used to activate the identity during the registration process.
Authorization: "Basic <base64(clientId:clientSecret)>"
Payload:
{
        userId: string,
        deviceName: string
}

Response:
{
        mpinId: string,
        hashMPinId: string,
        actToken: string,
        expireTime: integer
}
# Useful links
- MIRACL Trust Verification Service is a service implementing various useful verification flows.
